
g5 installation manual
Welcome to the G5 Installation Manual, your comprehensive guide for successfully installing and configuring G5 devices․ This manual ensures safe, efficient, and accurate setup processes, covering essential steps, best practices, and troubleshooting tips for various G5 models․ Designed for professionals and hobbyists alike, it provides clear instructions to maximize performance and reliability․
1․1 Overview of G5 Installation
The G5 installation process involves a series of organized steps to ensure seamless integration of the device into your system․ Whether you’re working with the Garmin G5, LG G5, or Sterisil G5, the manual provides detailed guidance for each model․ From pre-installation checks to final testing, the process emphasizes safety, compatibility, and efficiency․ The installation is designed to be user-friendly, with clear instructions for both physical setup and software configuration․ By following the manual, you can ensure optimal performance, reliability, and compliance with regulatory standards, making the G5 installation a straightforward and successful experience․
1․2 Importance of Following the Manual
Adhering to the G5 Installation Manual is crucial for ensuring a safe, efficient, and successful installation․ Properly following the guidelines minimizes risks of system failure, unsafe operation, and non-compliance with regulations․ The manual provides step-by-step instructions tailored to specific G5 models, such as Garmin, LG, and Sterisil, ensuring compatibility and optimal performance․ Deviating from the manual can lead to substandard results, potential damage to the device, or legal issues․ By following the manual, you ensure reliability, efficiency, and adherence to manufacturer standards, guaranteeing a seamless and professional installation experience․
1․3 Target Audience
This manual is designed for individuals responsible for installing and configuring G5 devices, including Garmin G5, LG G5, and Sterisil G5 models․ It is tailored for professionals such as aviation technicians, smartphone service providers, and dental practice staff requiring Sterisil G5 setup․ Additionally, it serves DIY enthusiasts and maintenance personnel seeking detailed installation guidance․ The manual assumes a basic understanding of technical procedures but provides clear instructions to ensure successful installation․ Whether you’re a novice or an experienced installer, this guide offers comprehensive support to meet your specific G5 installation needs effectively and safely․

Pre-Installation Requirements
Ensure system compatibility, gather necessary tools, and adhere to safety guidelines before starting the installation․ Regulatory compliance must also be verified for a smooth process․
2․1 System Compatibility Check
Before proceeding with the installation, it is crucial to verify that your system meets all the compatibility requirements for the G5 device․ Ensure that your hardware specifications, such as processor speed, RAM, and operating system version, align with the manufacturer’s recommendations․ Additionally, check for any software dependencies or firmware updates that may be necessary for optimal performance․ This step ensures a seamless installation process and prevents potential issues during operation․ Always refer to the official documentation or manufacturer’s website for the most accurate and up-to-date compatibility information․
2․2 Tools and Materials Needed
To ensure a smooth installation, gather the necessary tools and materials beforehand․ Essential tools include screwdrivers (Phillips and flathead), pliers, wrenches, and cable ties․ For specific models, additional tools like torque wrenches or multimeters may be required․ Materials needed typically include mounting hardware (e․g․, screws, brackets), power cables, and connectors․ Always refer to the manufacturer’s list of recommended tools and materials to avoid missing critical items․ Optional accessories, such as adhesive strips or protective covers, may also be useful․ Ensure all components are compatible with your G5 model for a successful installation․
2․3 Safety Precautions
Before starting the installation, ensure a safe working environment by disconnecting power sources and grounding equipment to prevent electrical shocks․ Wear protective gear, such as gloves and safety glasses, to minimize risks of injury․ Avoid working in hazardous conditions, like wet environments or areas with flammable materials․ Follow proper lifting techniques to prevent physical strain․ Review all safety guidelines in the G5 manual and ensure compliance with local regulations․ Properly label and isolate power lines during installation․ Keep the workspace well-ventilated and free from obstructions to maintain clarity and focus․ Safety is paramount to avoid accidents and ensure a successful installation․
2․4 Regulatory Compliance
Ensure all installations comply with local, national, and international regulations․ The G5 device must be installed in accordance with applicable electrical and safety standards, such as FCC, CE, and IEC certifications․ Verify that the system meets environmental and emissions requirements․ Familiarize yourself with specific regulations for your region to avoid legal or operational issues․ Compliance ensures proper functionality, safety, and adherence to industry standards․ Always refer to the manufacturer’s guidelines for region-specific installation requirements to guarantee full regulatory alignment and system performance․
Physical Installation Steps
Begin by preparing the installation site and ensuring all components are ready․ Mount the G5 device securely, connect cables and wires according to the manufacturer’s instructions, and tighten all fasteners․ Verify proper alignment and stability to ensure reliable operation․ Follow the sequence outlined in the manual to avoid misalignment or damage․ Double-check all connections before finalizing the installation to guarantee safety and performance․ Proper physical installation is crucial for optimal functionality and longevity of the G5 system․
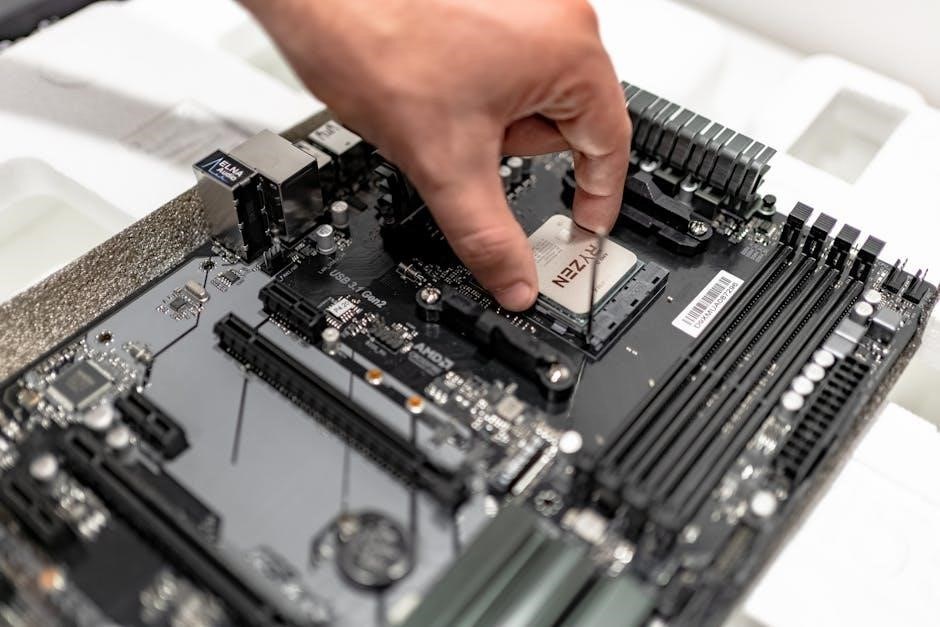
3․1 Mounting the G5 Device
Mounting the G5 device is the first critical step in the physical installation process․ Ensure the surface is clean, dry, and level to prevent any imbalance or instability․ Locate the mounting brackets or holes provided on the G5 unit and align them with the installation site․ Secure the device using the recommended screws or fasteners, tightening them firmly but avoiding overtightening, which could damage the housing․ Double-check the alignment to ensure proper fit and functionality․ Use a spirit level to verify the device is perfectly horizontal or vertical, depending on the manufacturer’s specifications․ Once mounted, ensure the unit is stable and free from movement or wobble․ Proper mounting is essential for accurate performance and longevity of the G5 system․
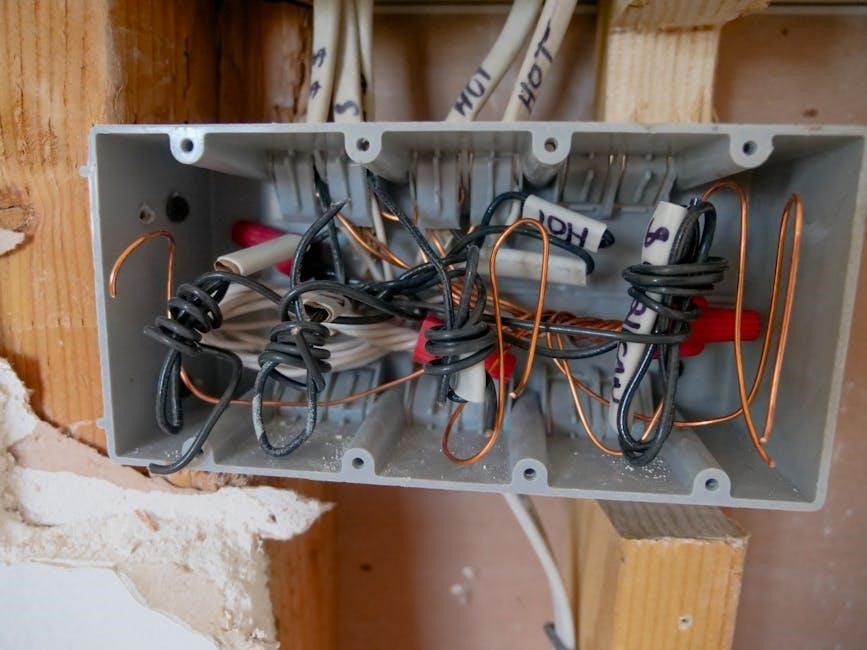
3․2 Connecting Cables and Wires
Connecting cables and wires is a critical step in the G5 installation process․ Begin by identifying the appropriate ports and connectors on the G5 device․ Carefully attach the power cable to the designated power inlet, ensuring a secure connection․ Next, connect any data or communication cables to their respective ports, following the manufacturer’s wiring diagram․ Use cable ties or clips to organize and secure the wires, preventing them from being pinched or damaged․ Double-check all connections for tightness and verify that no cables are loose or improperly routed․ Finally, power on the device and test all connections to ensure proper functionality․
3․3 Securing the Unit
Securing the G5 unit is essential to ensure stability and prevent damage during operation․ Use the provided mounting hardware to firmly attach the device to its base or surface․ Tighten all fasteners evenly to avoid misalignment․ Ensure the unit is level and plumb to maintain proper functionality․ For aircraft installations, follow the specific torque specifications outlined in the Garmin G5 Electronic Flight Instrument Installation Manual․ Double-check all connections and ensure no wires are pinched or strained․ Finally, verify the unit’s stability by gently rocking it to confirm it is securely fastened․ This step is critical for both safety and performance․

Software Configuration
Configure the G5 software by launching the configuration tool, selecting device-specific settings, enabling necessary features, and setting up user preferences for optimal performance and connectivity․
4․1 Installing the G5 Software
To install the G5 software, download the latest version from the official manufacturer’s website․ Run the installer and follow the on-screen instructions to complete the installation․ Ensure your system meets the compatibility requirements before proceeding․ Once installed, launch the software and configure settings according to your device type, such as Garmin G5 or LG G5․ Refer to the provided documentation for model-specific instructions․ After configuration, restart your system to apply changes․ If issues arise, consult the troubleshooting section or contact support for assistance․ Proper installation ensures optimal performance and functionality of your G5 device․
4․2 Setting Up Device Parameters
After installing the G5 software, configure device parameters to ensure optimal performance․ Access the software interface and select your G5 model, such as Garmin G5 or LG G5, from the dropdown menu․ Enter the required settings, including calibration values, communication protocols, and operational modes, as specified in the manual․ For advanced models like the UVC-G5 Turret Ultra, enable features such as UV intensity or motion sensors․ Sync the settings with your hardware to apply changes․ Refer to the specific device manual for detailed parameter requirements․ Proper configuration ensures accurate functionality and compatibility with your system․ Consult troubleshooting guides if issues occur during setup․
4․3 Calibrating the System
Calibrating the G5 system ensures accurate performance and reliability․ After software installation, access the calibration menu via the device interface․ Follow on-screen instructions to initialize the process, which may vary depending on the G5 model, such as Garmin G5 or LG G5․ For advanced systems like the UVC-G5 Turret Ultra, ensure sensors and UV settings are calibrated according to the manual․ Once calibration is complete, restart the system to apply changes․ Proper calibration is critical for optimal functionality; failure to calibrate may result in malfunctioning․ Refer to the troubleshooting section if calibration issues persist․

Post-Installation Testing
After installation, perform a thorough system test to ensure proper functionality․ Run the Power-On Self-Test (POST) to verify hardware integrity․ Conduct functional checks to confirm all features operate as expected, including data accuracy and system responsiveness․ Address any issues promptly using troubleshooting guidelines to maintain performance and reliability․
5․1 Power-On Self-Test (POST)
The Power-On Self-Test (POST) is an automated diagnostic process that verifies the G5 system’s hardware functionality upon startup․ Ensure the device is properly powered and connected․ The POST checks critical components such as sensors, display units, and communication interfaces․ If the system passes the POST, it will display a confirmation message․ In case of failures, error codes or LED indicators will signal specific issues․ Refer to the troubleshooting section for resolving POST-related errors․ Completing the POST ensures the G5 is ready for further testing and operation, providing a reliable foundation for system functionality․
5․2 Functional Verification
Following the POST, perform a thorough functional verification to ensure all G5 system components operate as intended․ Start by powering on the device and accessing the main interface․ Test all input and output functions, including buttons, sensors, and data transmission․ Verify the display accuracy and responsiveness․ For specific models like the Garmin G5, check the calibration and navigation features․ For the LG G5, ensure touchscreen functionality and app integration․ For the Sterisil G5, validate UV operation and water purification status․ Confirm that all features align with the manufacturer’s specifications․ Document any discrepancies for further troubleshooting or adjustment․
5․3 Troubleshooting Common Issues
During post-installation testing, identify and address common issues promptly․ Start by consulting the user manual for error codes or alerts․ Check for loose connections or incorrect configurations․ Power cycle the device to resolve temporary glitches․ Verify sensor calibration and data accuracy․ If issues persist, reset the device to factory settings or update the software․ For specific models like the Garmin G5, ensure GPS and navigation features are functioning correctly․ For the LG G5, check touchscreen responsiveness and app integration․ Document all issues and solutions for future reference or technical support assistance․

Garmin G5 Specific Installation Guidelines
Adhere to the Garmin G5 STC for aviation compliance․ Ensure installation by certified professionals․ Follow rev-specific instructions for model 190-01112-10․ Review flight instrument integration carefully․
6․1 Pre-Installation Requirements for Garmin G5
Before installing the Garmin G5, ensure compliance with aviation standards and regulatory requirements․ Verify system compatibility with your aircraft’s existing avionics․ Obtain the necessary STC approval for your specific aircraft model․ Review the installation manual (Part 23 AML STC, 190-01112-10) thoroughly․ Ensure all components, including the display unit, sensors, and wiring, are included in the kit․ Confirm the aircraft’s electrical system can support the G5’s power requirements․ Conduct a pre-installation inspection to identify potential conflicts․ Plan the installation layout to minimize wiring complexity․ Ensure a certified avionics technician performs the installation to maintain compliance and safety standards․ Proper preparation ensures a smooth and reliable installation process․
6․2 Physical Installation of Garmin G5
Mount the Garmin G5 display unit securely in the instrument panel, ensuring proper alignment and visibility․ Install the attitude and heading sensors, magnetometer, and air data computer in accordance with the STC guidelines․ Route wiring carefully, avoiding interference with other avionics systems․ Connect power and data cables to the appropriate terminals, ensuring correct polarity and voltage․ Secure the G5 system to prevent vibration or movement during flight․ Perform a visual inspection to verify all connections and components are properly installed․ Refer to the Garmin G5 Installation Manual (Part 23 AML STC, 190-01112-10) for detailed mounting and wiring instructions․ Ensure all steps align with aviation safety standards․
6․3 Software Configuration for Garmin G5
Begin by installing the Garmin G5 software from the provided installation media or download it from the official Garmin website․ Follow the on-screen instructions to complete the installation process․ Once installed, launch the configuration tool and input the required parameters, such as aircraft-specific data and sensor calibration settings․ Ensure all sensors, including the attitude indicator and magnetometer, are properly aligned and configured․ Refer to the Garmin G5 Installation Manual (Part 23 AML STC, 190-01112-10) for detailed configuration steps․ Perform a system test to verify all settings are correct and functioning as expected․ Adhere strictly to the guidelines provided in the manual to ensure compliance with aviation standards․
6․4 Troubleshooting Garmin G5
Common issues during Garmin G5 installation include power-on failures, screen glitches, or sensor malfunctions․ First, ensure all connections are secure and power sources are stable․ Restart the system and verify sensor alignment․ If the issue persists, refer to the Garmin G5 Installation Manual (Part 23 AML STC, 190-01112-10) for diagnostic steps․ Perform a factory reset if necessary and recalibrate sensors․ For unresolved problems, contact Garmin support or consult the troubleshooting section in the manual․ Always follow safety guidelines to prevent unsafe operation, as outlined in the documentation․ Regular software updates can also resolve firmware-related issues․ Ensure compliance with aviation standards during troubleshooting․

LG G5 Specific Installation Guidelines
Install LG G5 by verifying system compatibility, using the provided toolkit, and following safety protocols․ Ensure proper hardware and software setup for optimal performance and functionality․
7․1 Pre-Installation Requirements for LG G5
Before installing the LG G5, ensure system compatibility by checking hardware specifications and software version requirements․ Verify the power supply meets the device’s needs and backup data to prevent loss․ Gather necessary tools and materials, such as screws and cables, and prepare a clean, stable workspace․ Ensure all pre-installation software updates are applied and any conflicting programs are disabled․ Review safety guidelines, including proper grounding to prevent static damage․ Finally, consult the official LG G5 installation guide for model-specific instructions to ensure a smooth setup process․
7․2 Physical Installation of LG G5
Begin by carefully unpacking the LG G5 device and ensuring all components are included․ Prepare the installation site, ensuring a stable and flat surface․ Follow the manufacturer’s guide to align and mount the device securely, using provided screws or brackets․ Connect the power supply and any additional cables, ensuring proper alignment and tight connections․ Double-check all wiring for safety and functionality․ Once mounted, secure the unit firmly to prevent movement․ Finally, power on the device and verify basic functions before proceeding to software configuration․ Always refer to the official LG G5 manual for specific mounting instructions․
7․3 Software Configuration for LG G5
Launch the LG G5 software installer from the provided CD or downloaded file․ Follow the on-screen instructions to complete the installation․ Connect the device to your computer via the recommended interface․ Once connected, open the configuration utility and select the appropriate model from the dropdown menu․ Configure network settings, such as IP address and port numbers, according to your system requirements․ Set up administrator credentials and ensure all parameters align with your operational needs․ Finally, update the firmware if necessary and restart the device to apply changes․ Consult the LG G5 manual for detailed software settings and optimization tips․
7․4 Troubleshooting LG G5
Identify common issues during LG G5 installation, such as power failures or software glitches․ Check all connections and ensure the device is properly powered․ Restart the system if the display remains unresponsive․ For connectivity problems, verify network settings and ensure the device is detected․ If software installation fails, reinstall the program and ensure compatibility with your operating system․ Consult the LG G5 manual for specific error codes and solutions․ Regularly update firmware to resolve performance issues․ If persistent problems occur, contact LG support or refer to the troubleshooting section in the manual for advanced guidance and repair options․
Sterisil G5 Specific Installation Guidelines
The Sterisil G5 installation requires careful setup of its six-stage purification system and Class A UV disinfection․ Follow specific guidelines to ensure optimal water treatment and system longevity․
8․1 Pre-Installation Requirements for Sterisil G5
Before installing the Sterisil G5, ensure the system compatibility with your setup․ Verify the power supply meets specifications and allocate sufficient space for the unit․ Check the water supply quality and ensure all components are included․ Review regulatory standards to comply with local requirements․ Ensure proper ventilation and access for maintenance․ Familiarize yourself with safety precautions to avoid damage or injury․ Confirm the Class A UV disinfection standards are met․ These steps ensure a smooth and safe installation process for the Sterisil G5 system․
8․2 Physical Installation of Sterisil G5
Mount the Sterisil G5 on a stable, level surface near a power source and water supply․ Ensure the unit is securely anchored to prevent movement․ Connect the UV disinfection module and purification stages according to the manufacturer’s guidelines․ Verify all water supply lines are properly sealed and connected to avoid leaks․ Ensure the power cable is safely routed and plugged into a suitable outlet․ Double-check all connections for tightness and integrity․ Once installed, perform a visual inspection to confirm the system is correctly assembled․ Finally, test the system by running water through it to ensure proper function before regular use․
8․3 Software Configuration for Sterisil G5
Download and install the official Sterisil G5 software from the manufacturer’s website․ Connect the device to your computer using the provided USB cable․ Launch the software and follow the on-screen instructions to complete the installation․ Configure system settings such as UV intensity, purification stages, and water quality monitoring parameters․ Enable data logging to track performance and maintenance needs․ Calibrate the system using the software’s built-in calibration tool․ Ensure all settings align with your specific requirements․ Refer to the user manual for detailed guidance․ Once configured, test the system to confirm proper operation and data accuracy․ Regular software updates are recommended for optimal functionality․
8․4 Troubleshooting Sterisil G5
Common issues with the Sterisil G5 include UV light malfunctions, error messages, or inconsistent water quality․ If the UV light fails to activate, check the power supply and ensure the light is clean․ For error messages, reboot the system and verify all connections․ If water quality issues persist, inspect the filtration stages and ensure proper installation․ Refer to the troubleshooting section in the manual for detailed solutions․ Regularly update the software to resolve firmware-related problems․ If issues remain unresolved, contact Sterisil support for assistance․ Always follow safety guidelines when troubleshooting to avoid system damage or exposure to untreated water․

UVC-G5 Turret Ultra Setup
Welcome to the UVC-G5 Turret Ultra setup guide․ This section provides essential steps for a seamless installation experience, ensuring your device operates optimally from the start․
9․1 Pre-Installation Requirements for UVC-G5 Turret Ultra
Before installing the UVC-G5 Turret Ultra, ensure the following requirements are met:
– Verify system compatibility with your hardware and software setup․
– Ensure a stable power supply and proper ventilation for optimal performance․
– Allocate sufficient space for the unit to prevent overheating․
– Prepare the necessary tools and materials for installation․
– Review and download the latest software and firmware updates․
– Ensure network connectivity for remote configuration and updates․
– Familiarize yourself with the user manual and safety guidelines․
– Check for any regulatory compliance specific to your region․
– Backup your data before proceeding with the installation process․
9․2 Physical Installation of UVC-G5 Turret Ultra
Begin by carefully unboxing the UVC-G5 Turret Ultra and ensuring all components are included․ Mount the device in a secure, stable location, following the manufacturer’s guidelines for placement․ Connect the power cable to a reliable source and ensure proper ventilation to prevent overheating․ Next, attach any additional accessories, such as sensors or brackets, using the provided hardware․ Secure the unit firmly to avoid movement during operation․ Finally, double-check all connections and ensure the device is level before proceeding to software configuration․ Proper physical installation is critical for optimal performance and safety․
9․3 Software Configuration for UVC-G5 Turret Ultra
After physical installation, proceed with software configuration․ Connect the UVC-G5 Turret Ultra to your network using the provided Ethernet cable or Wi-Fi setup․ Download and install the latest software from the manufacturer’s website․ Launch the configuration tool and follow on-screen instructions to set up device parameters, such as UV intensity, operation schedules, and sensor thresholds․ Ensure the device is synchronized with your system and test all functions to confirm proper operation․ Refer to the user manual for advanced settings and customization options to optimize performance for your specific application․

Best Practices for G5 Installation
Adhere to manufacturer guidelines for optimal performance․ Schedule regular maintenance checks to ensure longevity․ Keep software updated for enhanced functionality and security․ Properly handle and store equipment to avoid damage․
10․1 Following Manufacturer Guidelines
Adhering to manufacturer guidelines is crucial for a successful G5 installation; These instructions are tailored to ensure compatibility, safety, and optimal performance․ For Garmin G5, LG G5, and Sterisil G5, specific requirements vary, so always consult the respective manuals․ Compliance with system compatibility checks and regulatory standards is non-negotiable․ Deviating from guidelines can lead to malfunctions or void warranties․ Proper tools and materials, as specified, must be used to avoid damage․ Regular software updates and maintenance, as recommended, ensure longevity and efficiency․ Always follow the step-by-step processes outlined for your specific G5 model to achieve reliable results․
10․2 Regular Maintenance
Regular maintenance is essential to ensure the G5 system operates at peak performance․ Schedule periodic checks to clean components, inspect cables, and verify all connections․ For devices like the Garmin G5, ensure the display is free from obstructions․ Update software regularly to maintain functionality and security․ Refer to the manufacturer’s guidelines for specific maintenance schedules․ Address any issues promptly to prevent system downtime․ Proper upkeep extends the lifespan of your G5 installation, ensuring reliability and optimal performance over time․ Consistent maintenance also aligns with best practices for safety and efficiency in G5 operations․
10․3 Updating Software
Regular software updates are crucial for maintaining optimal performance and security of your G5 system․ Always download updates from official sources to ensure authenticity and compatibility․ Before updating, back up your data and ensure the device has sufficient power․ Follow the step-by-step instructions provided in the manual or manufacturer’s website․ For devices like the Garmin G5, updates may include new features or bug fixes․ After updating, restart the system and verify functionality․ Keeping software current ensures you benefit from the latest enhancements and security patches, maintaining the integrity and efficiency of your G5 installation․